PowerShell is a powerful command-line interface (CLI) that allows you to automate and manage Windows systems. One of the best ways to customise your PowerShell experience is by creating a custom profile. A profile is a script that runs every time you start PowerShell, and it can be used to set up your environment, load modules, and run custom commands. In this article, I’ll show you how to create and customise your own PowerShell profile.
First, let’s see if you already have a profile. To check if you have a profile, open PowerShell and run the following command:
Test-Path $ProfileThis command will return true if a profile already exists, and false if it does not. If the command returns false, you can create a new profile by running the following command:
New-Item -Path $Profile -ItemType File -ForceThis command will create a new profile script at the location $Profile. You can open this script in any text editor, like PowerShell ISE, Notepad or Visual Studio Code, and start editing it. The location of where your profile is saved will be shown after you create it, as per the below screenshot.

One of the first things you might want to do is to set your preferred colour scheme. PowerShell uses the console host to display its output, and the console host uses a colour scheme to determine the colors of text, background, and other elements. You can change the colour scheme by adding the following line to your profile:
$Host.UI.RawUI.BackgroundColor = "DarkBlue"
$Host.UI.RawUI.ForegroundColor = "White"
You can change the colour to any value you like, such as yellow, green, pink, or red, whichever colour combination works best for you. I actually like the black background, but this is just about demonstrating the posibilities to you.
Another useful customisation is to add frequently used modules to your profile. For example, if you work with Azure a lot, then you might want to automatically import that module by adding the below code to your profile (don’t forget to install the module first, if you don’t have it already):
Import-Module AzureYou can also add your own custom functions to your profile. For example, you can create a function that opens a specific folder in Windows Explorer:
Function Open-Folder {
    param([string]$folder)
    Start-Process explorer.exe $folder
}
You can then use this function to open a folder by running the command Open-Folder c:\ from the PowerShell console.
You can also customise the appearance of your PowerShell prompt. The prompt is the text that appears before the cursor, and it can display information like the current working directory, the time, and the username. You can change the prompt by adding the following line to your profile:
Function prompt {
    $datetime=$(Get-Date).ToString("dd/MM/yyyy HH:mm:ss")
    "$datetime [$env:username] > "
}
This will display the current date and time, followed by the username, and a greater than sign.
Finally, you can even display a personal welcome message, by using the below code:
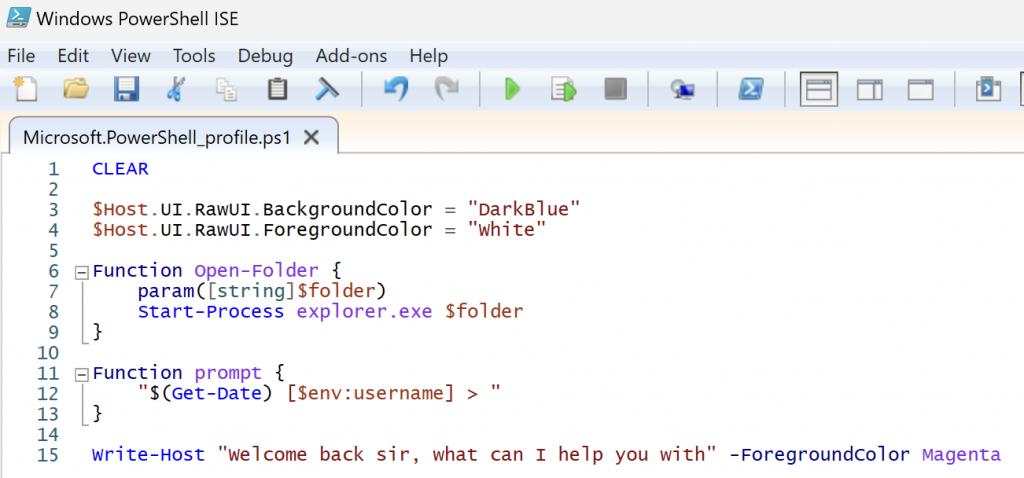
Write-Host "Welcome back sir, what can I help you with" -ForegroundColor MagentaYour custom profile script will look a little like this (I took the screenshot before I formatted the date):


I prefer the black background in general, so mines looks like this:

If you see an error saying that runing scripts is disabled, like below, then run the below command (as administrator):

Set-ExecutionPolicy RemoteSignedIn conclusion, customising your PowerShell profile can greatly improve your experience and productivity when working with the command line. By creating a custom profile, you can set up your environment, load modules, and run custom commands each time you load PowerShell. You can also change the colour scheme, add frequently used commands, create custom functions, and customise the appearance of the prompt.
With a little bit of creativity, you can make PowerShell work the way you want it to. Please comment below with your customisations.

