

If you’re hosting a static website on AWS S3, you’ve probably discovered that S3’s native hosting capabilities are somewhat limited when it comes to security and performance. Adding Cloudflare as a reverse proxy solves these problems whilst also improving your site’s speed and reliability.
This guide walks through the complete setup process, explaining not just the how but the why behind each configuration choice.
Why S3 Static Hosting Needs Cloudflare
AWS S3 storage is excellent for storing and serving static files, but its website hosting features are notably lacking, but to be fair, that’s not really what it was created for.
No Native HTTPS Support
S3 website endpoints only support HTTP. The endpoint format http://bucket-name.s3-website-eu-west-2.amazonaws.com cannot serve content over HTTPS. This is problematic because modern browsers flag HTTP sites as “Not Secure”, search engines penalise non-HTTPS sites in rankings, and you cannot implement security headers without HTTPS.
No Security Headers
S3 cannot add HTTP security headers to responses. You cannot configure HTTP Strict Transport Security (HSTS), Content Security Policy (CSP), X-Frame-Options, Referrer-Policy, or any other protective headers directly on S3. Whilst S3 does offer CORS configuration, this serves a different purpose — it controls whether other domains can make JavaScript requests to your bucket, not the security headers sent to browsers visiting your site.
No TLS Version Control
With S3 alone, you have no control over which TLS versions clients can use to connect. This matters because older TLS versions (1.0 and 1.1) have known vulnerabilities, and compliance requirements like PCI DSS mandate TLS 1.2 or higher.
Limited Caching Control
Whilst S3 supports Cache-Control headers on objects, you cannot configure edge caching behaviour, cache purging, or cache bypass rules at the storage layer.
No DDoS Protection
S3 has basic AWS Shield protection, but adding Cloudflare provides additional application-layer DDoS mitigation specifically designed for web traffic.
Prerequisites
Before starting, ensure you have the following ready:
- An AWS account with permissions to create and configure S3 buckets
- A domain name you control, with the ability to modify DNS records
- A Cloudflare account (the free tier is sufficient for this setup)
- Your static website files ready to upload, or an existing S3 static website
Step 1: Create and Configure the S3 Bucket
If you haven’t already created your S3 bucket for static hosting, here’s the process.
Create the Bucket
Navigate to the S3 console and create a new bucket. The bucket name should match your domain name exactly if you want to use the website endpoint. For example, if your site will be at example.com, name the bucket example.com.
Select your preferred AWS region. Choose one geographically close to your primary audience, though Cloudflare’s caching will reduce the importance of this choice for repeat visitors.
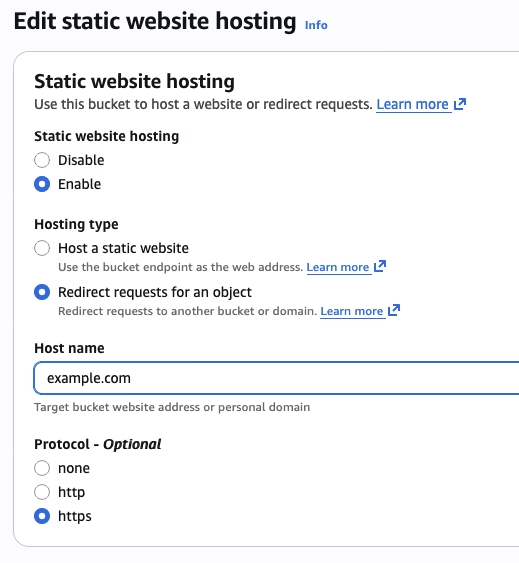
Enable Static Website Hosting
In the bucket properties, enable static website hosting. Set the index document to index.html and optionally configure an error document such as 404.html.
Note the endpoint URL that S3 provides. It will look something like http://example.com.s3-website-eu-west-2.amazonaws.com. You’ll need this for Cloudflare configuration.
Configure Bucket Policy
For Cloudflare to fetch content from your bucket, you need a bucket policy that allows public read access. Add the following policy, replacing your-bucket-name with your actual bucket name:
{
    "Version": "2012-10-17",
    "Statement": [
        {
            "Sid": "PublicReadGetObject",
            "Effect": "Allow",
            "Principal": "*",
            "Action": "s3:GetObject",
            "Resource": "arn:aws:s3:::your-bucket-name/*"
        }
    ]
}You’ll also need to disable the “Block all public access” settings for this policy to take effect. This is safe because Cloudflare will be the primary entry point, and we’ll configure additional protections there.
Upload Your Content
Upload your static website files to the bucket. Ensure your index.html is at the root level. Test that the S3 website endpoint works by visiting it directly in your browser.
Step 2: Add Your Domain to Cloudflare
Create a Cloudflare Account
If you haven’t already, sign up at cloudflare.com. The free plan includes everything needed for this setup.
Add Your Site
Click “Add a Site” and enter your domain name. Cloudflare will scan your existing DNS records. Review these and ensure any records you want to keep are present.
Update Nameservers
Cloudflare will provide you with two nameservers. Update your domain registrar’s nameserver settings to point to these Cloudflare nameservers. This change can take up to 48 hours to propagate, though it’s often much faster.
Once propagation completes, Cloudflare will send a confirmation email.
Step 3: Configure DNS Records
With your domain active on Cloudflare, configure DNS to point to your S3 bucket.
Add a CNAME Record
Create a CNAME record with the following settings:
- Type: CNAME
- Name:
@for the root domain (orwww) - Target: Your S3 website endpoint, e.g.,
example.com.s3-website-eu-west-2.amazonaws.com - Proxy status: Proxied (orange cloud enabled)
The orange cloud icon indicates traffic will route through Cloudflare’s network, which is essential for the security and performance benefits we’re configuring.

Www Sub Domain Consideration
If you want your site accessible at the www. too (e.g., www.example.com), you have options:
- Cloudflare supports CNAME flattening, which allows you to create a CNAME record for the root domain. This wouldn’t normally be possible with standard DNS, but Cloudflare resolves the CNAME to an A record at query time.
- Configure a redirect rule to send www. traffic to root domain. You could use Javascript or something else
- Setup a separate S3 bucket for the www. entry, set the CNAME in Cloudflare and use the S3 redirect functionality (example below for Cloudflare DNS and S3 Redirection)

Step 4: Configure SSL/TLS Settings
This is where Cloudflare addresses S3’s biggest limitation. Navigate to the SSL/TLS section in your Cloudflare dashboard.
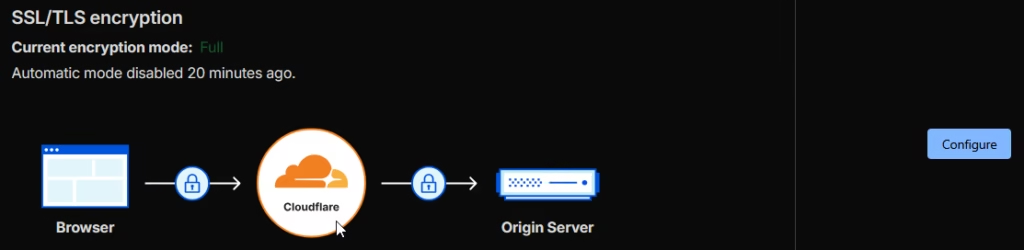
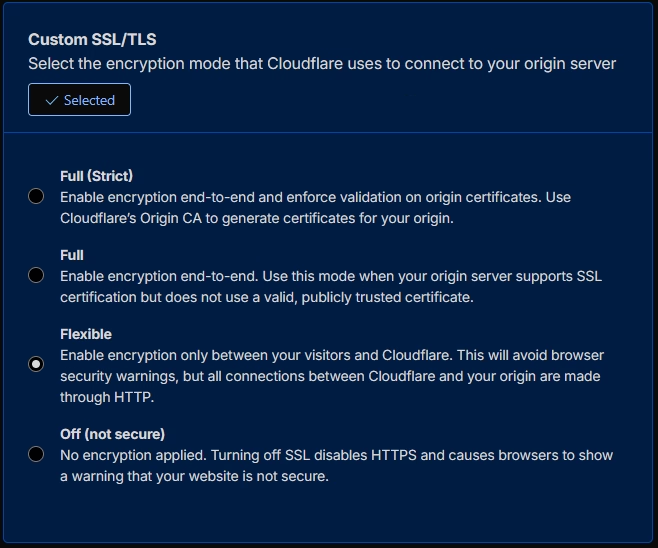
Set the Encryption Mode
Set the encryption mode to Flexible. This means traffic between visitors and Cloudflare is encrypted (HTTPS), and traffic between Cloudflare and your visitors, and your origin (S3) uses HTTP or HTTPS as available.
Do not use Full (Strict) because S3 website endpoints don’t support HTTPS and don’t have valid SSL certificates. Using Full (Strict) would cause connection failures.
The Flexible mode will work best, but if you can, use Full. Remember, if it doesn’t work, change it back.
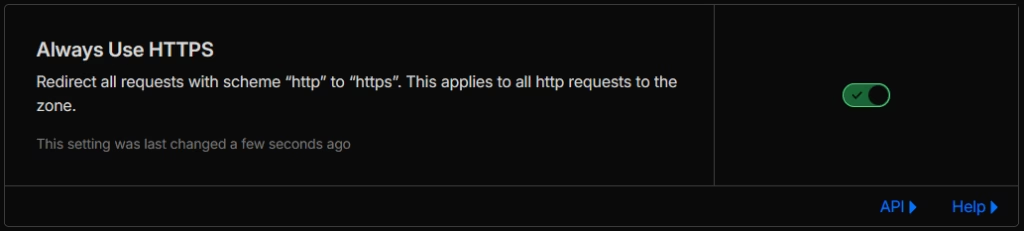
Enable Always Use HTTPS
Under Edge Certificates, enable “Always Use HTTPS”. This automatically redirects all HTTP requests to HTTPS, ensuring visitors always use the encrypted connection.
Set Minimum TLS Version
Under Edge Certificates, set the minimum TLS version to TLS 1.2. This prevents connections using older, vulnerable TLS versions.

TLS 1.0 and 1.1 have known vulnerabilities and are deprecated by all major browsers. Requiring TLS 1.2 or higher ensures connections use secure cipher suites and are not susceptible to attacks like BEAST or POODLE.
For maximum security, you could require TLS 1.3, but this may exclude some older clients. TLS 1.2 strikes a good balance between security and compatibility.
Enable TLS 1.3
Ensure TLS 1.3 is enabled (it should be by default). TLS 1.3 offers improved security and faster handshakes compared to TLS 1.2. Clients that support it will use it automatically.

Step 5: Configure HTTP Strict Transport Security (HSTS)
HSTS is a security header that instructs browsers to only connect to your site over HTTPS, even if the user types http:// or clicks an HTTP link.
Why HSTS Matters
Without HSTS, there’s a window of vulnerability. When a user first visits your site or when their browser cache expires, they might make an initial HTTP request before being redirected to HTTPS. An attacker performing a man-in-the-middle attack could intercept this initial request.
HSTS eliminates this window by telling browsers to always use HTTPS for your domain, converting any HTTP requests to HTTPS before they leave the browser.
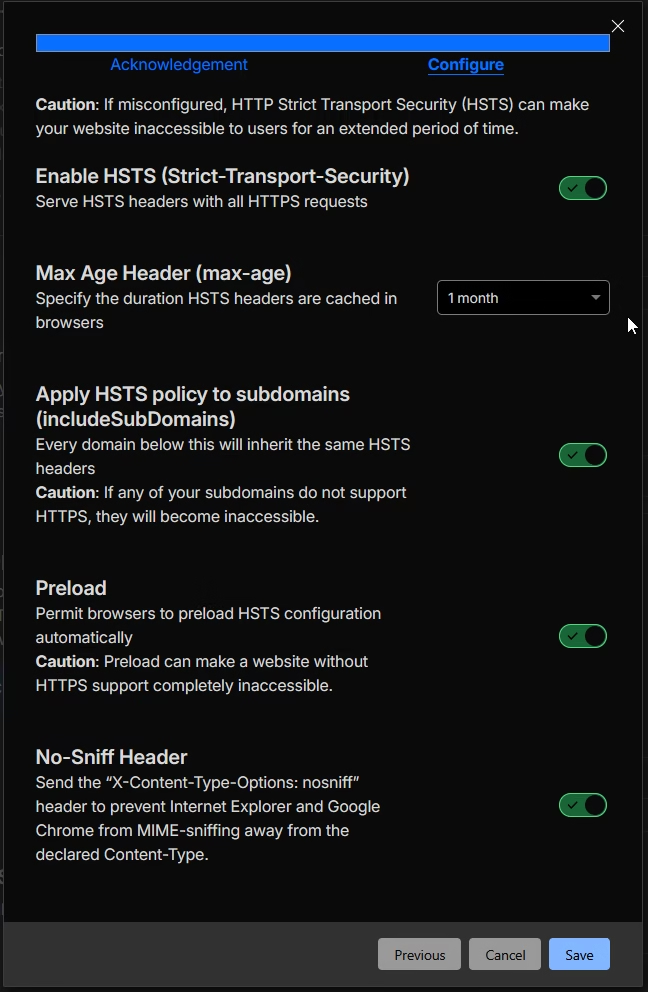
Enable HSTS in Cloudflare
Navigate to SSL/TLS > Edge Certificates and find the HSTS settings. Enable HSTS with the following recommended configuration:
- Max-Age: I’ve gone with 1 month, but set a value when you are comfortable, and especially if your site is static.
- Include subdomains: Enable if all your subdomains support HTTPS.
- Preload: Only enable once you’re committed to HTTPS permanently.
- No-Sniff Header: Enable to prevent MIME-type sniffing attacks.

Understanding HSTS Preloading
The preload directive requests inclusion in browser HSTS preload lists. Once your domain is in these lists, browsers will never make an HTTP connection to your site, eliminating even the first-visit vulnerability.
However, preloading has serious implications. Removing your domain from preload lists is difficult and slow. Only enable preloading once you’re certain your site will always support HTTPS and you understand the commitment.
To be eligible for preloading, you must serve a valid HTTPS certificate, redirect all HTTP traffic to HTTPS, serve the HSTS header on the root domain with a max-age of at least one year, and include the preload directive.
Step 6: Configure Security Headers
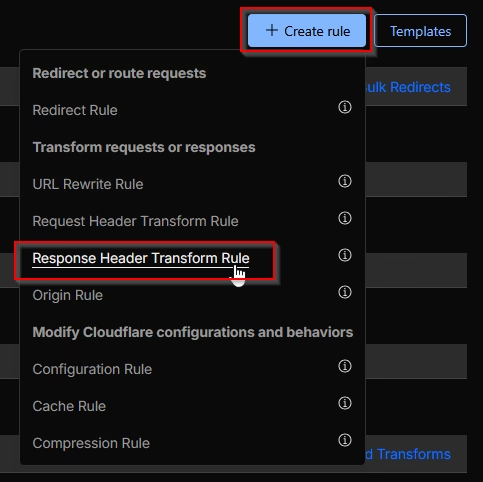
Cloudflare can add security headers that S3 cannot serve. Navigate to Page Rules > Page Rulesto configure response header modifications.
Create Header Modification Rules
Create a new response header modification rule with these recommended headers:
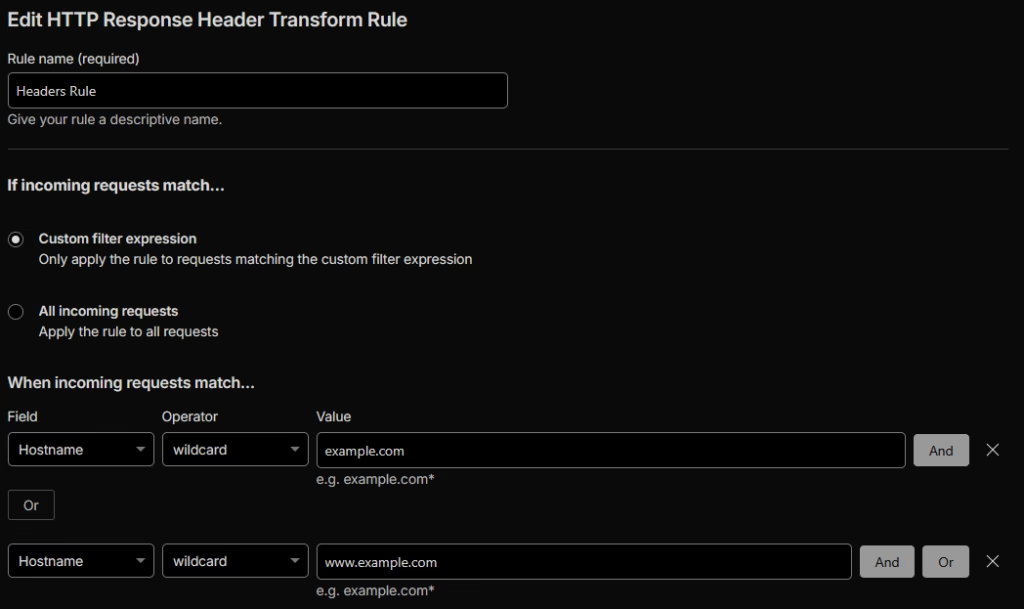
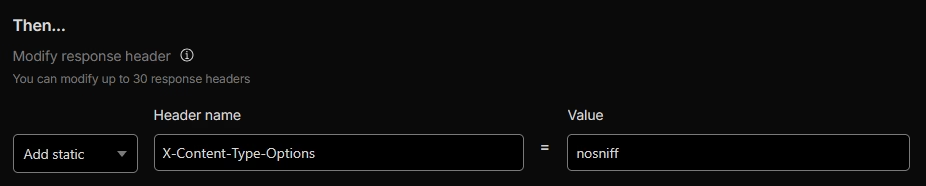
X-Content-Type-Options
Set to nosniff. This prevents browsers from MIME-sniffing responses away from the declared Content-Type, mitigating certain attack vectors.
X-Frame-Options
Set to DENY or SAMEORIGIN. This prevents your site from being embedded in frames or iframes on other domains, protecting against clickjacking attacks.

Referrer-Policy
Set to strict-origin-when-cross-origin. This controls how much referrer information is sent with requests, balancing functionality with privacy.

Permissions-Policy
Configure based on what features your site uses. A restrictive default might be geolocation=(), microphone=(), camera=() to disable these browser features if your site doesn’t need them.

Content-Security-Policy
This is the most complex header to configure correctly. Start with a report-only policy to identify issues before enforcing. A basic restrictive policy might begin with default-src 'self' and then be relaxed based on your site’s actual requirements.

If you’re using Google Analytics, or any other external service, consider a variation, like the below (also includes buymeacoffee.com, to show how you can include more items:
default-src 'self'; script-src 'self' 'unsafe-inline' https://www.googletagmanager.com https://cdn.buymeacoffee.com; style-src 'self' 'unsafe-inline'; img-src 'self' data: https://cdn.buymeacoffee.com; font-src 'self' data:; connect-src 'self' https://www.google-analytics.comX-Powered-By
This will removed the detail about what your system runs on, IIS etc. Removing this is always good, as it takes one more piece of information away from the bad actors that might find your site and want to try to breach it.
Navigate to Rules > Settings and turn on the below:

Step 7: Configure Caching
Cloudflare’s caching reduces requests to your S3 origin, improving performance and reducing costs.
Page Rules for Caching
Navigate to Caching > Cache Rules.

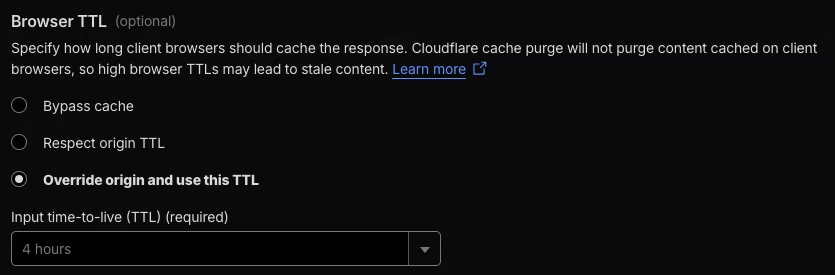
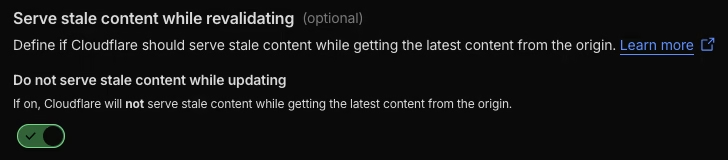
Create a rule for your static assets with these settings:
Edge TTL: 1 day
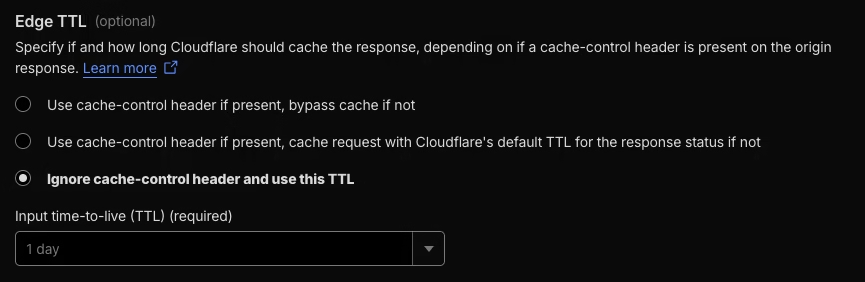
Browser TTL: 4 hours or 1 day, depending on how long you want the cache to stay in place
Serve stale content while revalidating: Enable
For truly static content that rarely changes, aggressive caching improves performance significantly. For content that updates more frequently, balance freshness against performance.
Cache Rules (Alternative)
Cloudflare’s newer Cache Rules provide more granular control than Page Rules. You can create rules based on hostname, path, file extension, and other criteria, with separate controls for browser and edge cache behaviour.
Step 8: Additional Security Configurations
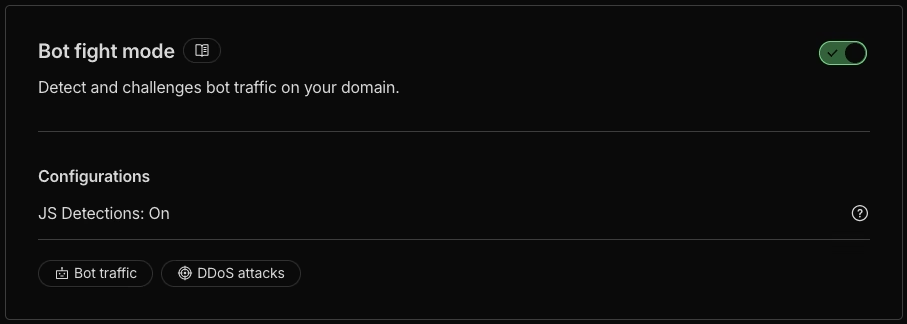
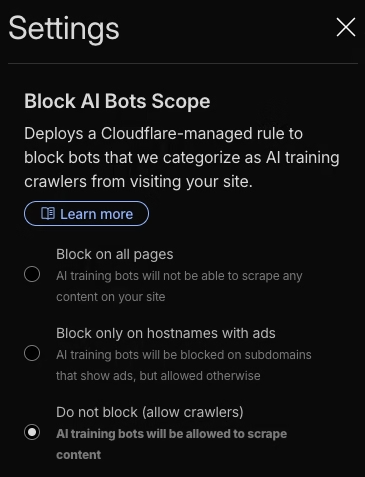
Enable Bot Fight Mode
Under Security > Bots, enable Bot Fight Mode. This challenges requests from known bad bots whilst allowing legitimate crawlers like Googlebot.
Security Level
Under Security > Settings, the Security Level controls how aggressively Cloudflare challenges potentially malicious visitors. “Medium” is a reasonable default for most sites.
Other considerations
Consider setting up is WAF (Web Application Firewall) and rate limiting. I won’t go into it here, as it will depend on your site, but you should look into this and setup what rules you can in the free tier, or perhaps even pay for a higher tier.
If you don’t have security.txt and robots.txt files in your website already, you can also create these on Cloudflare too.
Step 9: Verify Your Configuration
Test HTTPS
Visit your site using https:// and confirm the padlock icon appears. Check that HTTP requests redirect to HTTPS.
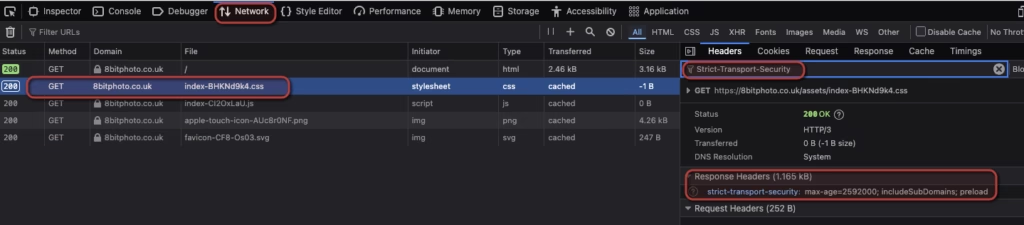
Test HSTS
Use browser developer tools to examine response headers. You should see the Strict-Transport-Security header with your configured values.
In Chrome, Edge or Firefox:
- Open your site
- Press F12 (or right-click → Inspect)
- Click the Network tab
- Refresh the page (F5)
- Click on any request (e.g., your HTML file, a CSS file, an image)
- Look at the Headers panel on the right – search for Strict-Transport-Security
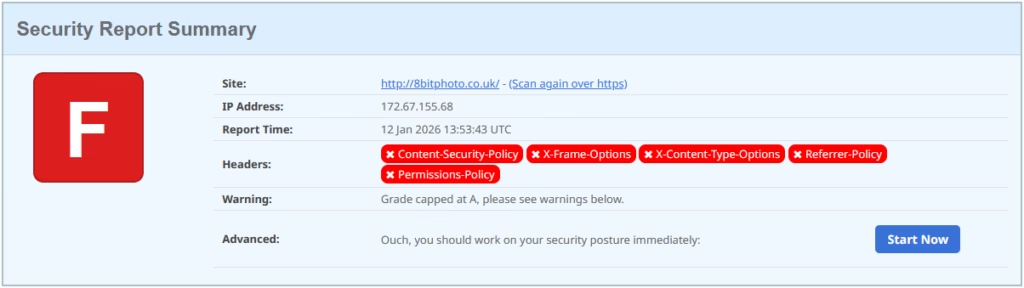
Test Security Headers
Use securityheaders.com (make sure you check the option to hide the results, if you want) to scan your site and verify all configured security headers are present and correctly formatted.
To start with, you might see a score like this:
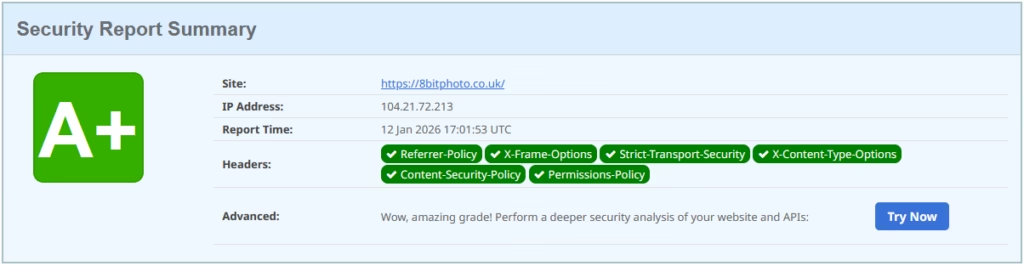
When you’re done, you’ll see improvements in the score, like below:
Test Caching
Use browser developer tools and look for cf-cache-status: HIT to confirm Cloudflare is caching content. To do this, do the below:
In Chrome, Edge or Firefox:
- Open your site
- Press F12 (or right-click → Inspect)
- Click the Network tab
- Refresh the page (F5)
- Click on any request (e.g., your HTML file, a CSS file, an image)
- Look at the Headers panel on the right – scroll down to Response Headers

| Value | Meaning |
| HIT | Served from Cloudflare’s cache |
| MISS | Fetched from S3, now cached for next time |
| DYNAMIC | Not cached (usually HTML by default) |
| EXPIRED | Was cached, but TTL passed — refetching |
Troubleshooting Common Issues
522 Connection Timed Out
This error means Cloudflare couldn’t reach your S3 origin. Verify your DNS record points to the correct S3 website endpoint, check that the S3 bucket is publicly accessible, and ensure the bucket name and region in the endpoint are correct.
521 Web Server Is Down
Similar to 522, this indicates origin connectivity issues. Double-check your S3 static website hosting is enabled and the endpoint is responding when accessed directly.
Content Not Updating
If changes to your S3 content don’t appear, Cloudflare may be serving cached content. Purge the cache in Cloudflare’s dashboard under Caching > Configuration > Purge Cache.
Mixed Content Warnings
If your browser warns about mixed content, your HTML may reference HTTP resources. Update all resource URLs to use HTTPS or protocol-relative URLs.
Cost Considerations
This architecture is cost-effective for most static websites. Cloudflare’s free plan includes unlimited bandwidth, SSL certificates, basic DDoS protection, and global CDN.
S3 costs are based on storage and requests. With Cloudflare caching most requests, your S3 request costs decrease significantly. You pay primarily for storage and the cache-miss requests that reach S3.
For higher-traffic sites or those needing advanced features, Cloudflare’s paid plans offer additional WAF rules, advanced DDoS protection, image optimisation, and priority support.
Keep in mind that Cloudflare support is restricted to the community, unless you are on a paid tier.
Summary
Setting up Cloudflare in front of S3 transforms a basic static hosting setup into a secure, performant, and professionally configured web presence. The key benefits are SSL/TLS encryption with your own domain and certificate management, HSTS protection against downgrade attacks, minimum TLS version enforcement for security compliance, security headers that S3 cannot provide natively, global CDN with intelligent caching, DDoS protection at the edge, and cost reduction through cached request serving.
If you’ve followed this guide completely, it will setup you up with a strong security baseline. Depending on your specific requirements, you may want to adjust caching durations, add additional WAF rules, or configure specific page rules for different content types.