

In today’s digital landscape, protecting your data against ransomware, cyber threats, and system failures is more critical than ever. Veeam Backup and Replication is a powerful tool for ensuring your data’s safety, but to maximise its effectiveness, hardening your Veeam deployment is essential. Below are some actionable tips to enhance the security and reliability of your Veeam Backup and Replication environment.
1) Deploy the 3-2-1-1-0 Rule
The 3-2-1-1-0 backup strategy is an essential part of Veeam’s best practices:
- 3: Keep three copies of your data.
- 2: Store these copies on two different media types.
- 1: Have at least one copy offsite.
- 1: Keep one immutable or air-gapped backup.
- 0: Ensure zero backup recovery issues through regular testing.
Tip: Leverage Veeam’s immutability feature on repositories such as hardened Linux repositories, object storage like Amazon S3 with Object Lock and Veeam Cloud.
If you use QNAP NAS devices, I strongly recommend installing the QuObjects, which allows you to create S3 storage with object locks, allowing you to configure immutable backsups.
2) Disable WINS / NetBIOS
To disable WINS and NetBios, follow the below steps:
1) Open your network adapter settings
2) Double click ‘Internet Protocol Version 4 (RCP/IPv4)’

3) Click ‘Advanced’

Select the ‘WINS’ tab and then ‘Disable NetBIOS over TCP/IP’
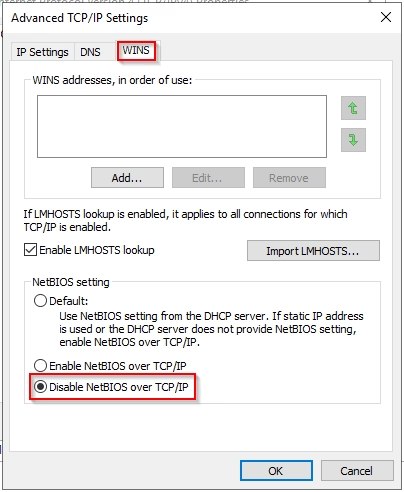
4) Click ‘OK’ three times until you close out of the network adapter settings.
5) Run ‘Notepad’ as an administrator
6) Open your host file (e.g. c:\Windows\System32\drivers\etc\hosts)
7) Add the below line to your host file
255.255.255.255 wpad8) Save the changes and close notepad
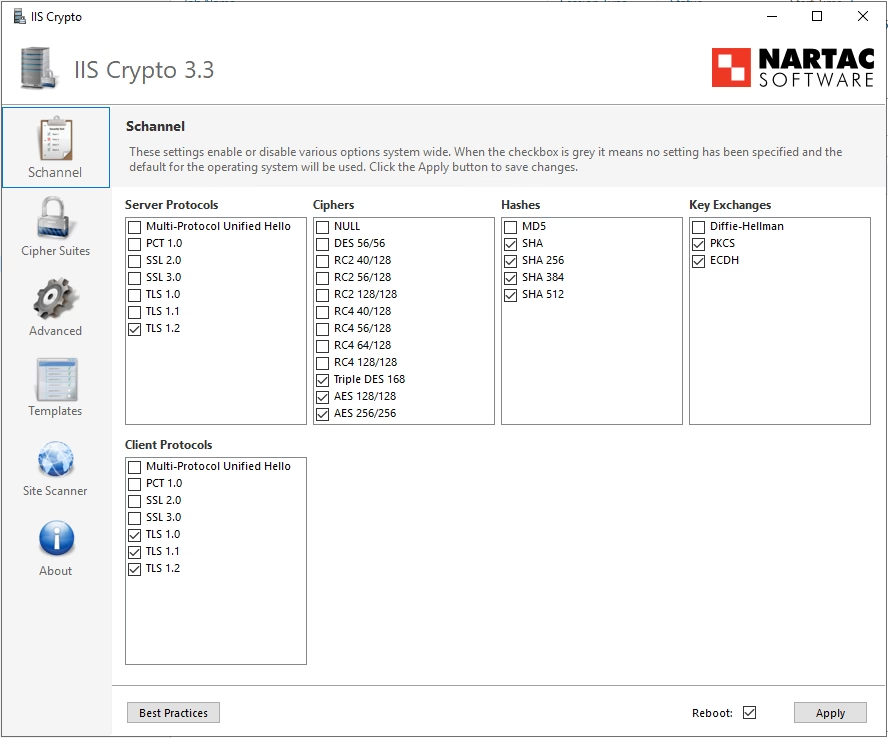
3) Disable TLS 1.0 and 1.1
To disable the older TLS versions, there are multiple ways, but I find using IIS Crypto make it easy.
1) Download the GUI version from https://www.nartac.com/products/iiscrypto/download
2) Run IIS Crypto
3) Take a screenshot of your current settings, in case you need to return them to the same state later
4) Click ‘Best Practices’
5) Untick TLS 1.0 and TLS 1.2 under ‘Server Protocols’ (leave Client Protocols as they are)

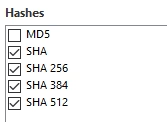
6) Untick ‘MD5’ under ‘Hashes’
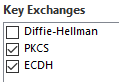
7) Untick ‘Diffie-Hellman’ under ‘Key Exchanges’
8) Tick the ‘Reboot’ option, and if no jobs are running and you are happy to make the changes, click ‘Apply’
9) After the reboot, make sure everything works, including the Veeam consoles and backups.
4) Enable encryption on your backups
When you configure your backups, it’s essential that you enable encryption and securely store the encryption key. You set this up on a per job basis, but you may chose to have the same encryption key.
To find this setting, follow the below for each job:
1) Edit a backup job, select ‘Storage’, then the ‘Advance button’
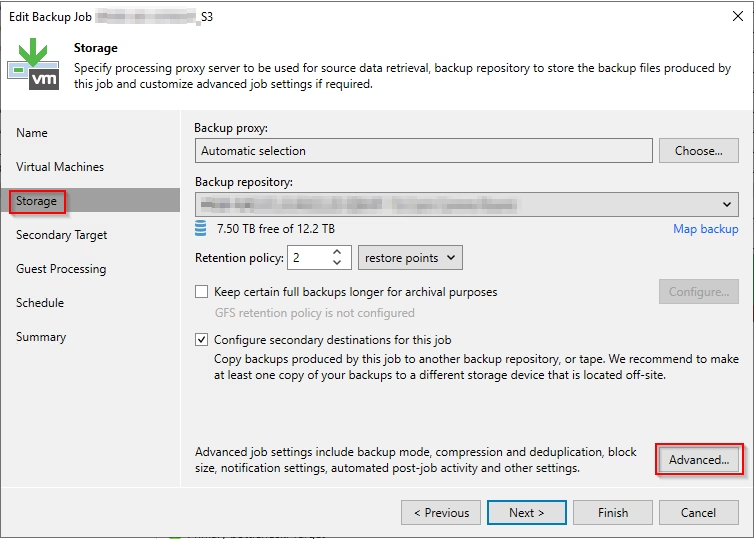
2) If you have an encryption key added already, you can select it, otherwise click ‘Add’
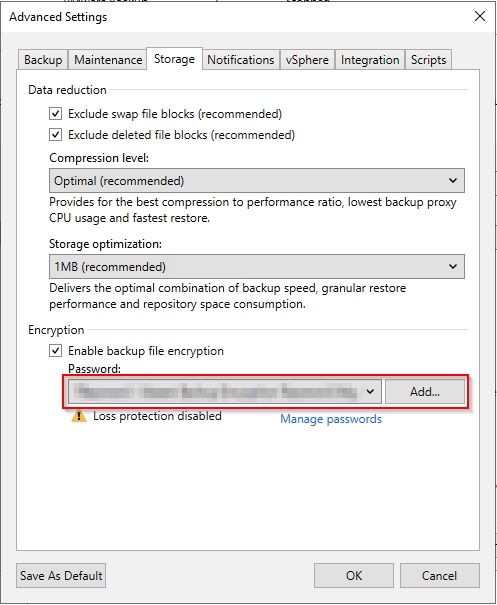
If you have Veeam Enterprise installed, it will save the key and the ‘Loss protection disabled’ warning will not show. If you store this key securely in a password manager or key vault though, then there is nothing to worry about.
5) Isolate your backup infrastructure
It sounds obvious, but it’s not always considered. Ensure that you have a separate VLAN for your backup repositories and traffic, and if possible disable internet access from that VLAN.
6) Enable MFA
Make sure that MFA is enabled for all of your admin accounts.
7) Test your backups
It stands to reason that you’ll want confidence in your backups, and the best way to do this is to test them. Many say that you should do this annually, but I recommend quarterly and rotate the servers you try, and test a backup from each repo.
Also, try restoring to a cloud environment (AWS, Azure etc), in case your physical environment is no longer available. This is often overlooked by many, and where most people struggle.
8) Use Veeam ONE
If you can, install Veeam ONE, as it will give you some really useful addition insight. Veeam ONE provides a range of benefits that make it an indispensable part of a robust data protection and management strategy. Some key benefits include:
1) Comprehensive Monitoring and Reporting Real-time monitoring of your backup and virtual infrastructures, with customisable dashboards that provide insights into performance, capacity, and potential issues.
2) Proactive Issue Resolution Alerts for anomalies or potential failures in backup jobs, infrastructure components, or virtual machines with automated remediation actions reduce downtime and enhance system reliability.
3) Capacity Planning Predicts future storage and resource needs based on historical trends.
4) Enhanced Visibility Monitors multi-cloud and hybrid cloud environments alongside on-premises systems.
5) Data Protection Compliance Generates reports to demonstrate compliance with regulations like GDPR, HIPAA, or ISO standards.
6) Tracks RTO (Recovery Time Objective) and RPO (Recovery Point Objective) achievements.
7) Improved Security Detects suspicious activity and unauthorised changes in backup infrastructure.
8) Integrates with audit logs to ensure accountability and track system access.
9) Automation and Efficiency Streamlines backup job creation and management.
10) Enables proactive alerts for capacity thresholds and backup job failures.
11) Scalability Adapts to small, medium, and enterprise environments.
12) Scales seamlessly as backup and virtual infrastructure grows.
13) Ease of Use User-friendly interface with intuitive navigation.
14) Built-in intelligence reduces the learning curve for new users.
9) Implement Role-Based Access Control (RBAC)
Restricting access based on roles ensures only authorised users perform specific tasks, and this is essential for protecting data and ensuring that only those with the skills and permissions can make changes.
Steps to Set Up RBAC:
1) Define Roles and Permissions: Identify roles such as administrators, backup operators, and auditors. Assign specific permissions to each role in Veeam Backup and Replication.
2) Create Custom Roles: If predefined roles don’t meet your requirements, create custom roles tailored to your organization’s needs.
3) Assign Users to Roles: Map users or groups to the appropriate roles using Active Directory or local accounts.
4) Apply the Principle of Least Privilege (PoLP): Grant only the minimum level of access necessary for each role.
5) Monitor and Audit Access: Use Veeam ONE or built-in logging to track role assignments and user activity.
Tip: Regularly review role assignments and revoke unnecessary permissions.
Veeam have also recently released a feature called Four-Eyes, that requires authentication and approval by two administrators to make drastic changes (e.g. deleting backups), which is another great way to protect your data.
Conclusion
Just installing Veeam, and enabling a basic setup is not enough to stay secure. The steps above will contribute to securing you data, but I recommend you consult Veeam’s documentation and follow their best practices.
If you take away anything from this article, it should be to make sure you have multiple copies of your backups, they are immutable and that you test them.