

Introduction
Creating a bootable USB drive for VMware ESXi is an essential step for a smooth and efficient installation process. This guide provides a step-by-step guide to create an ESXi bootable USB drive, ensuring that even beginners and seasoned IT professionals can deploy their virtualisation environments with ease. By following these detailed instructions, you’ll not only streamline your installation process but also avoid common pitfalls that can delay your setup.
Table of Contents
Requirements
Before you begin, ensure you have the following:
- A USB flash drive with at least 8GB of storage.
- A computer with internet access.
- VMware/Broadcom ESXi ISO file.
- Rufus or any other bootable USB creation tool.
Steps to Create the Bootable USB Drive
Follow these steps to create your ESXi bootable USB drive:
1. Download the VMware ESXi ISO file
Visit the Broadcom website and download the latest ESXi ISO file. They’ve really made this hard to locate the files now, since they bought VM Ware, but you’ll need to find the version that you’re licensed to use.
2. Prepare the USB flash drive
Insert your USB flash drive into your computer. Ensure it is empty as the process will format the drive.
3. Download and Install Rufus
Rufus is a free tool that allows you to create bootable USB drives. Download and install Rufus from its official website.
4. Create the bootable USB drive
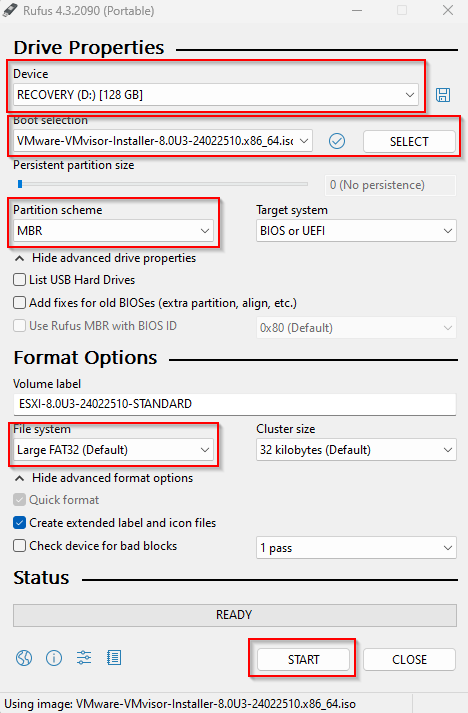
Open Rufus and select your USB flash drive under the ‘Device’ dropdown. Click ‘Select’ and choose the downloaded ESXi ISO file. Ensure ‘Partition scheme’ is set to ‘MBR’ and ‘File system’ is set to ‘FAT32’. Click ‘Start’ and wait for the process to complete
Conclusion
By following these steps, you should now have a bootable USB drive ready for your ESXi installation. This drive can be used to install ESXi on your server, enabling you to set up your virtual environment.